Page: 1
/ 14
Total 235 questions
Microsoft AZ-800 Administering Windows Server Hybrid Core Infrastructure Exam Practice Test
Question 1
SIMULATION
Task 3
You need to run a container that uses the mcr.microsoft.com/windows/servercore/iis image on SRV1. Pott 60 on the container must be published to port 5001 on SRV1 and the container must run in the background.
Answer : A
To run a container on SRV1 using the mcr.microsoft.com/windows/servercore/iis image, publish port 60 on the container to port 5001 on SRV1, and ensure it runs in the background, you can follow these steps:
Step 1: Pull the IIS Image First, pull the IIS image from the Microsoft Container Registry:
docker pull mcr.microsoft.com/windows/servercore/iis
Step 2: Run the Container Next, run the container with the required port mapping and ensure it runs in the background using the -d flag:
docker run -d -p 5001:60 --name iis_container mcr.microsoft.com/windows/servercore/iis
This command will start a container named iis_container using the IIS image, map port 60 inside the container to port 5001 on SRV1, and run the container in detached mode.
Step 3: Verify the Container is Running To verify that the container is running and the port is published, use the following command:
docker ps
This will list all running containers and show the port mappings.
Step 4: Access the IIS Server You can now access the IIS server running in the container by navigating to http://<SRV1_IP>:5001 in a web browser, where <SRV1_IP> is the IP address of SRV1.
By following these steps, you should be able to run the IIS container on SRV1 with the specified port mapping and have it running in the background.
Question 2
SIMULATION
Task 2
You need to ensure that you can manage SRV1 remotely by using PowerShell
Answer : A
To manage SRV1 remotely using PowerShell, you'll need to set up PowerShell Remoting. Here's a step-by-step guide:
Step 1: Enable PowerShell Remoting on SRV1 On SRV1, run the following command to enable PowerShell Remoting:
Enable-PSRemoting -Force
This command configures the computer to receive PowerShell remote commands that are sent by using the WS-Management technology.
Step 2: Configure the TrustedHosts List (If Needed) If you're managing SRV1 from a computer that is not part of the same domain, you'll need to add the managing computer's name to the TrustedHosts list on SRV1:
Set-Item wsman:\localhost\Client\TrustedHosts -Value 'ManagingComputerName' -Concatenate -Force
Replace ''ManagingComputerName'' with the name of your managing computer.
Step 3: Start a Remote Session From your managing computer, start a remote session with SRV1 using the Enter-PSSession cmdlet:
Enter-PSSession -ComputerName SRV1 -Credential (Get-Credential)
This command prompts you for credentials and then starts a remote session with SRV1.
Step 4: Run Remote Commands Once the remote session is established, you can run any PowerShell command as if you were directly on SRV1. For example:
Get-Service
This command gets the status of services on SRV1.
Step 5: Exit the Remote Session When you're finished, exit the remote session:
Exit-PSSession
By following these steps, you should be able to manage SRV1 remotely using PowerShell. Make sure you have the appropriate administrative privileges to perform these actions.
Question 3
SIMULATION
Task 1
You need to create a group-managed service account (gMSA) named gMSA1 and make gMSA1 available on SRV1.
Answer : A
To create a group-managed service account (gMSA) named gMSA1 and make it available on SRV1, you can follow these steps:
Step 1: Create the Key Distribution Services Root Key First, you need to create the KDS Root Key, which is required for the gMSA to function. You can do this with the following PowerShell command:
Add-KdsRootKey --EffectiveTime ((get-date).addhours(-10))
Note: The -EffectiveTime parameter is set to 10 hours in the past to ensure immediate effect.
Step 2: Create the gMSA Next, use the New-ADServiceAccount cmdlet to create the gMSA:
New-ADServiceAccount -Name gMSA1 -DNSHostName gmsa1.domain.com -PrincipalsAllowedToRetrieveManagedPassword SRV1$
Replace domain.com with your actual domain name.
Step 3: Install the gMSA on SRV1 Now, you need to install the gMSA on the server SRV1. Run the following command on SRV1:
Install-ADServiceAccount -Identity gMSA1
Step 4: Test the gMSA To ensure that the gMSA is installed correctly and ready for use, perform a test using:
Test-ADServiceAccount -Identity gMSA1
If the test returns True, the gMSA is correctly installed and ready for use on SRV1.
Step 5: Configure the Service to Use the gMSA Finally, configure the service that requires the gMSA to use gMSA1 by setting the service's logon account to domain\gMSA1$ and leave the password field blank.
Question 4
SIMULATION
Task 11
You need to ensure that all DHCP clients that get an IP address from SRV1 will be configured to use DC1 as a DNS server.
Answer : A
One possible solution to ensure that all DHCP clients that get an IP address from SRV1 will be configured to use DC1 as a DNS server is to use the DHCP scope options. DHCP scope options are settings that apply to all DHCP clients that obtain an IP address from a specific scope. You can use the DHCP scope options to specify the DNS server IP address, as well as other parameters such as the default gateway, the domain name, and the DNS suffix. Here are the steps to configure the DHCP scope options on SRV1:
On SRV1, openDNS Managerfrom theAdministrative Toolsmenu or by typingdnsmgmt.mscin the Run box.
In the left pane, expand your DHCP server and click onIPv4.
In the right pane, right-click on the scope that you want to configure and selectProperties.
In theScope Propertiesdialog box, click on theDNStab.
Check the boxEnable DNS dynamic updates according to the settings below. This option allows the DHCP server to register and update the DNS records for the DHCP clients.
Select the optionAlways dynamically update DNS records. This option ensures that the DHCP server updates both the A and PTR records for the DHCP clients, regardless of whether they request or support dynamic updates.
Check the boxDiscard A and PTR records when lease is deleted. This option allows the DHCP server to delete the DNS records for the DHCP clients when their leases expire or are released.
Check the boxDynamically update DNS records for DHCP clients that do not request updates. This option allows the DHCP server to update the DNS records for the DHCP clients that do not support dynamic updates, such as legacy or non-Windows clients.
In theDNS serverssection, click on theAddbutton to add a new DNS server IP address.
In theAdd Serverdialog box, enter the IP address of DC1, which is the DNS server that you want to use for the DHCP clients, and clickAdd.
ClickOKto close theAdd Serverdialog box and return to theScope Propertiesdialog box.
ClickOKto apply the changes and close theScope Propertiesdialog box.
Now, all DHCP clients that get an IP address from SRV1 will be configured to use DC1 as a DNS server. You can verify the DNS configuration by using theipconfig /allcommand on a DHCP client computer and checking theDNS Serversentry. You can also check the DNS records for the DHCP clients by using theDNS Managerconsole on DC1.
Question 5
SIMULATION
Task 10
You need to configure Hyper-V to ensure that running virtual machines can be moved between SRV1 and SRV2 without downtime.
You do NOT need to move any virtual machines at this time.
Answer : A
One possible solution to configure Hyper-V to ensure that running virtual machines can be moved between SRV1 and SRV2 without downtime is to use Live Migration. Live Migration is a feature of Hyper-V that allows you to move a running virtual machine from one host to another without any noticeable interruption of service. To set up Live Migration between SRV1 and SRV2, you need to perform the following steps:
On both SRV1 and SRV2, openHyper-V Managerfrom theAdministrative Toolsmenu or by typingvirtmgmt.mscin the Run box.
In the left pane, right-click on the name of the server and selectHyper-V Settings.
In theHyper-V Settingsdialog box, selectLive Migrationsin the navigation pane.
Check the boxEnable incoming and outgoing live migrations.
UnderAdvanced Features, you can optionally enable theUse any available network for live migrationoption, which allows Hyper-V to use any available network adapter on the source and destination servers for live migration. If you do not enable this option, you need to specify one or more network adapters to be used for live migration by clicking on theAddbutton and selecting the network adapter from the list. You can also change the order of preference by using theMove UpandMove Downbuttons.
ClickOKto apply the settings.
Now, you have configured Hyper-V to enable live migration between SRV1 and SRV2. You can use Hyper-V Manager or Windows PowerShell to initiate a live migration of a running virtual machine from one server to another.
Question 6
Your network contains an Active Directory Domain Services (AD DS) domain. The domain contains a server named Server1.
On Server 1, you install Windows Admin Center and use Windows Admin Center to remove BUILTlN\Users from the allowed groups.
Vou discover that all users can still sign in to Windows Admin Center.
Vou need to prevent unauthorized users from signing in to Windows Admin Center.
What should you do in Windows Admin Center?
Answer : D
Question 7
Your network contains an Active Directory Domain Services (AD DS) domain named contoso.com. The domain contains the servers shown in the following table.
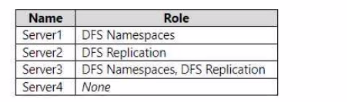
You need to create a Distributed File System (DFS) namespace that will contain the following:
* A domain-based namespace named \\contoso.com\Public
* A folder named Finance
Which servers can you configure as folder targets for the Finance folder?
Answer : B