Dell EMC D-PDD-DY-23 Dell PowerProtect DD Deploy 2023 Exam Practice Test
What is the maximum number of snapshots per MTree that can be stored on a PowerProtect DD?
Answer : A
PowerProtect DD allows up to 750 snapshots per MTree, supporting efficient data protection and recovery with minimal impact on storage resources. This feature provides extensive backup versioning options for granular data recovery.
Which backup application uses BoostFS?
Answer : D
BoostFS (Boost File System) is a specialized Dell EMC technology that integrates with backup applications to enable optimized data transfers to Dell EMC Data Domain systems. BoostFS works effectively with Dell's Avamar backup software, leveraging the Data Domain Boost technology to provide deduplication and improve backup efficiency. The BoostFS integration enables Avamar to utilize features like client-side deduplication, reducing data that needs to be transferred and stored on Data Domain systems, and enhancing performance and storage efficiency.
By using BoostFS with Dell Avamar, users benefit from enhanced backup speeds, optimized network bandwidth, and reduced load on the Data Domain system. The BoostFS integration also supports streamlined management and more effective use of storage resources, which aligns well with Dell EMC's strategy for comprehensive data protection.
What rule must be followed during an upgrade procedure with the FS25 expansion shelf?
Answer : D
The FS25 expansion shelf must be cabled on a separate private chain to avoid performance degradation and potential conflicts with other shelf types. This cabling rule ensures optimal data flow and stability within the PowerProtect DD system.
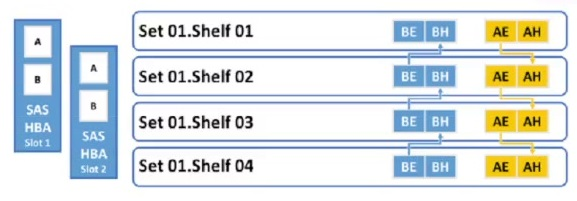
Refer to the exhibit.

To which shelf and port should SAS HBA slot 1 port B be connected?
Answer : D
Based on the configuration:
SAS HBA Slot 1 has ports labeled A and B.
The connection sequence suggests that:
Shelf 01 is the first shelf connected, and it has ports BE and BH.
Shelf 02 through Shelf 04 continues the pattern with their respective ports.
Given the layout:
SAS HBA Slot 1 Port B should be connected to Shelf 01 BH to maintain proper connectivity according to the configuration flow.
A PowerProtect DD appliance with two expansion shelves is being installed in a customer-provided rack.
When cabling the controller to the shelves, what is connected to the host port on the last shelf in the chain?
Answer : C
In a PowerProtect DD system, when setting up expansion shelves, the cabling follows a specific sequence to ensure proper communication between the controller and the shelves. The host port on the last shelf in the chain is connected to the expansion port of the controller to complete the loop. This ensures that data flows correctly between the controller and all shelves in the chain.
What needs to be configured when implementing LACP on a PowerProtect DD appliance to gain access to the underlying aggregated link connection?
Answer : C
When implementing Link Aggregation Control Protocol (LACP) on a PowerProtect DD appliance, a virtual network interface is created to aggregate the physical interfaces into a single logical link. This configuration is essential to enable LACP functionality, as it allows the system to balance network traffic effectively across multiple physical connections, enhancing redundancy and throughput. By aggregating these physical interfaces, the appliance can better handle high data volumes, providing stable and efficient access to the underlying network resources.
The virtual network interface manages the logical grouping, ensuring seamless failover and load balancing between the physical links that comprise the aggregated connection.
SIMULATION
Task
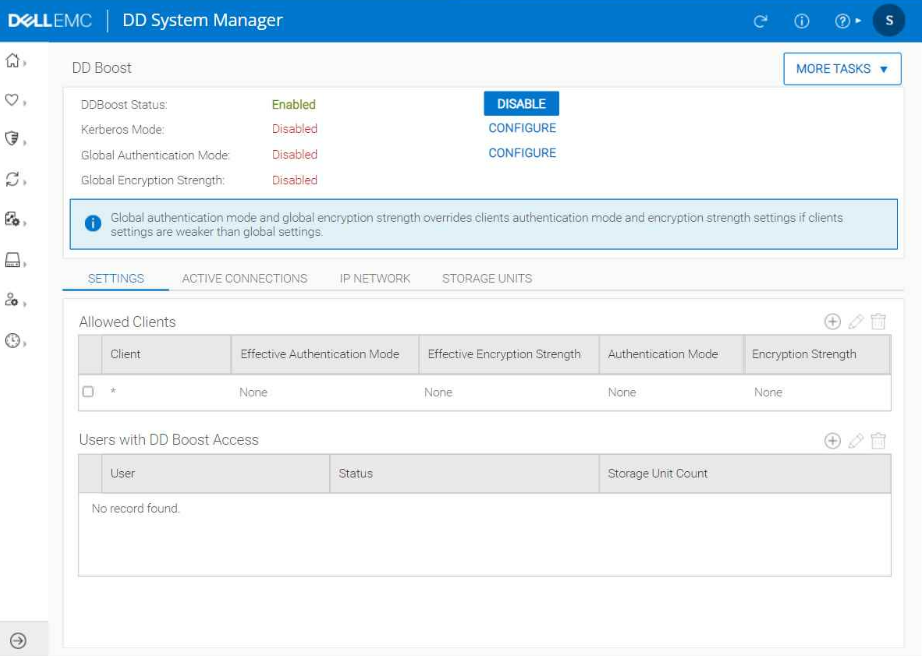
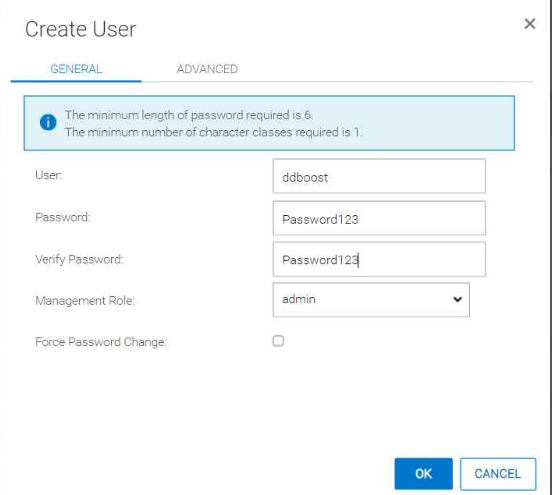
Use the simulator to configure DD Boost by enabling it and creating a new user (ddboost) with
the recommended permission. Use Password123 as the password. A storage unit name SU1 must be
created and accessible by the user.
When you have finished, continue to the next question.
Answer : A
To configure DD Boost, enable it, create a new user, and set up a storage unit in the DD System Manager, follow these steps:
Enable DD Boost:
In the Protocols section on the left sidebar, locate DD Boost and click on it.
Inside the DD Boost settings, find the option to enable DD Boost if it's currently disabled.
Create a New User:
Go to Administration or Users (location varies based on version).
Select Add User or New User.
Set the username as ddboost and the password as Password123.
Assign the appropriate permissions, typically Admin or Read/Write access, based on best practice recommendations for DD Boost users.
Create a Storage Unit:
Return to the DD Boost section.
Look for an option labeled Storage Units or similar, and choose Add Storage Unit.
Name the storage unit SU1.
Ensure that the newly created ddboost user has access to this storage unit.
Save and Confirm:
After configuring, save all settings and confirm the changes.
Verify that DD Boost is enabled, the user ddboost exists with the specified permissions, and the storage unit SU1 is created and accessible by this user.
This completes the setup for DD Boost with a new user and storage unit on PowerProtect DD. Let me know if you need more assistance with any of these steps.

